Saturday, March 24, 2012

Puppy Update


I went to visit my puppy yesterday and she is soooo sweet!!! All of the puppies are!!

We haven’t picked a name yet, but we have a few that we are thinking about. We will just wait until we spend some time with her and see what fits and what she likes!  She will be coming home next Friday or Saturday!!

026

018

029

Here is a photo album with all the pics I took of her:


I have been getting her crates ready and buying toys and stuff. I bought her a booster seat for the car and as I was putting the support bar in under the lining, Teddy Bear fell in love with it! He climbed in before I was finished putting the liner back in!

001   

002

As you can see, he is very satisfied!

007

I put the car seat next to the doggie and kitty toy baskets in the living room.  I hope Teddy doesn’t become too attached – this is for the car!  Uh oh! Mickey likes it too!!!!

012

One more week to go and then it will be puppy time!!! We can’t wait!!!!

Monday, March 12, 2012

We picked our puppy!


So, I spent some more time with the two puppies that I was choosing between, and I picked this little girl!!

001

001  

We will be bringing her home either the last day of March or the next weekend, depending on the vet’s advice. We are soooo excited!!!!

Wednesday, March 7, 2012

Puppies!!!!


We went and looked at Morkie (Maltese + Yorkie) puppies tonight!!! They are soooooo cute! I am definitely getting one!!!

001 002 
I am thinking about one of these two baby girls!! They are very sweet!!
005

  006 007 008 009 010
011
They were all over me from the minute I walked in! I could barely move around to sit down!!
012 013
Puppy pile!!!!!  I wore them out!! :)
015 016
Getting lots of puppy scent on a little blankie so the kitties will get used to the smell.
The puppies won’t be ready to come home for another 2-3 weeks, but I’ll be over to visit them again soon!!

Monday, November 28, 2011

Orca Bay Mystery Quilt Part 2


Today I have started on part 2 of the mystery quilt. 


This is my first time using strings and it is fun!!

I took Bonnie’s advice and am using phone book paper for my foundations.  It is great! It tears off very easily!

014


Here are the first four 3 1/2 inch squares!

015


My string squares and my pile of strings!

017


Check out the website! http://quiltville.blogspot.com/p/orca-bay-mystery.html

Orca Bay Mystery Quilt Part 1


I have started Bonnie Hunter’s Orca Bay Mystery Quilt!  My colors are pink, brown, green (accent color), and neutrals.
Bonnie’s website: http://quiltville.blogspot.com/p/orca-bay-mystery.html
I first iron my 1 1/2 inch strips right sides together so that they stick together a little better.
004


In order to break up the monotony of cutting, I cut in sets of 100 and then sewed them together and pressed them open.
002


Here is a batch of finished units. I still have to finish sewing all 224!!
010


You should do the mystery too!!! Go to http://quiltville.blogspot.com/p/orca-bay-mystery.html to get started!!

Monday, November 21, 2011

Quilt room clean-up


I have decided to participate in Bonnie Hunter’s Quiltville Orca Bay Mystery Quilt this year, but first I needed to clean up and reorganize my quilting room.  

003


This is my quilting room. I have been refolding fat quarters and yardage-sized pieces of fabric that have been laying around and piling up for about a year now.  Now I know what I have so that when it comes to picking fabrics for the mystery quilt I’m not hunting through piles going, “Oh! I forgot about that one!”
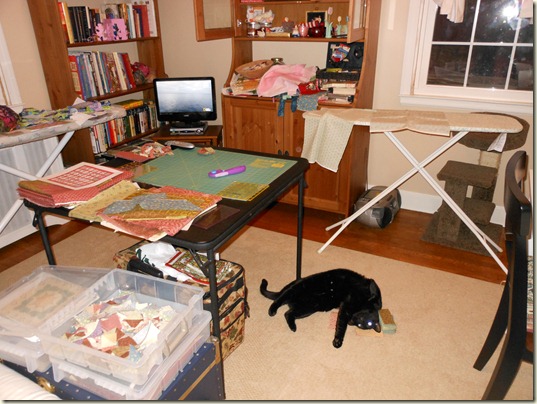


005
Of course, Teddy Bear is on the floor helping me with some border pieces for another quilt I am working on.  He loves to pose for the camera.


006


Here is the closet with shelves that I made myself.  Yes, I measured the distance between shelves, went to Home Depot and had the nice man cut the wood for me, marked, leveled, and drilled pilot holes, inserted plugs, screwed in the supports, put up the shelves, screwed them into the supports, installed center support brackets, and caulked and painted it all!  Whew!  A lot of work but totally worth it!
I store all my rulers, strip and square storage tubs, threads, and other quilting notions in there.


008


Here is my sewing table with my inspiration bulletin board.  The mini quilt pinned on there is made from the corner-cut-offs from another quilt that I made.  It still needs borders, but for now I really like it being right where it is. 
The baskets are a leftover from a wall quilt that I made (I’ll show it another time) and I’m thinking of making them into a cover for a long, skinny pillow.


010


Here is the relaxie futon where Teddy usually sleeps while I sew.  Laying over the back is part of a quilt top that I am working on, and underneath are two quilts that just need the binding finished.
All of the small pieces of fabrics laying around got cut up into strips, squares, strings, or crumbs and placed into the appropriate tubs.


013

Teddy is of course helping out by sitting in my tub with Thimbleberries corner-cut-offs.

Now I just need to pick my colors for the mystery quilt and get started!

Saturday, November 19, 2011

My knitted socks


After crocheting anything and everything for 12 years I needed a new challenge and became curious about knitting.  So, a couple of years ago I taught myself to knit, and I made a few hats for kids and helmet liners for the troops (a lady at my quilt guild was sending them overseas), but I felt that it was really difficult and I didn’t understand the anatomy of the stitches.  I put it away and thought, “Well, at least I know how to knit some.”

A few months ago I started looking at knitting magazines and websites and the knitting bug struck again, but this time I wanted to knit socks!  But I didn’t like the idea of the double pointed needles, they seemed scary to an already spooked beginning knitter, so I just kept dreaming of all the socks I wanted to make but was too afraid to tackle.  Then one day I happened upon a book that would change knitting for me forever: Knitting Circles Around Socks by Antje Gillingham!  She uses two sets of circular needles to make two socks at a time!  And I love circular needles! (No crowded stitches!) And making two socks at the same time means you don’t have to go back and count rounds and re-measure and stuff. Yeah!

My first knitted socks  My first knitted socks 2This is the first pair of socks that I made following the basic sock pattern in the book.  As you can see, in my excitement to begin knitting I forgot to make sure that the color change would coincide in each pair, so the stripes are not aligning properly.  But, hey,  it’s my first time and they fit and keep my feet warm, so I don’t mind!


my second knitted socks


Here is the second pair of socks I made from the same yarn.  This time I used the same basic sock pattern, but I did a rib stitch instead of stockinet stitch.  And I remembered to start the colors correctly so the stripes align!  I love my knitted socks and wear them at home when it’s cold.  I am currently making a pair for my hubby too!

my second knitted socks 4